Technical details about »Applied Mediocrity«
As you may or may not have noticed, my latest intro won the PC 64k competition at Evoke 2009. Unlike my previous demos and intros, it actually featured a few effects that go beyond fixed-function rendering or per-pixel lighting. For all who are interested in how it works, I’ve written this small article that explains how each of the eight effects in the intro is done, as well as some general insight into the creation process of the intro.
Design
First and foremost: There is no such thing as design in this intro. It is a simple effects show, and it was meant to be one from the start. Also, there’s no real »flow« (whatever that word may mean to you) in the intro. The only thing that connects the scenes is some half-hearted attempts at transitions or camera moves so that one scene starts with a solid color that is left behind from the previous scene.
The name »Applied Mediocrity« is a slight hint at how Kakiarts’ (moderate) success comes from: Even if every demo or intro we ever did is only mediocre from a technical point of view, we still appear to have some weird kind of charm that makes all the difference – hence applied mediocrity.
Technology
The intro is Win32-only, mainly because the only external library it relies on, farbrausch’s V2 synthesizer system is Win32-only. If there was a Linux port of this synthesizer (or any other halfway decent synthesizer), I could have compiled the intro for Linux easily: There are no Win32isms in the code and there should be no MSVCisms eithers, a port from Win32 to SDL already exists because the engine used in this intro is basically the same as in »8-Bit Wonderland«, even the setup dialog has already been ported from Win32 to Gtk+, and the graphics are OpenGL anyway.
I made sure that the intro runs well on recent graphics chips of both major manufacturers. Development was done on an nVidia GeForce 8600M GT, and ATI compatibility was checked with a Radeon HD3850 and HD4370. I didn’t have regular access to the ATI boxes, so I just used AMD GPU ShaderAnalyzer most of the time. To the never-ending nVidia vs. ATI wars I can just say that even though ATI made me use a workaround for a missing feature at one point in the development process, it was nVidia where I witnessed the only real drawing bug.
Effect #1: Intro with Vector Graphics
 The first scene writes some text on artificial paper and puts some symbols around it. This is a very simple effect, but nevertheless it required much work, because I had to write an (almost) full vector graphics engine. The main parts of this are a TrueType importer (which is executed during initialization of the intro) and an SVG importer which converts paths to a compact, quantized (8 bits per coordinate) internal representation that compresses well. The tesselation into OpenGL primitives is thankfully done by the standard GLU library, but subdividing the Bézier curves into small line segments is still done »by hand«. Unfortunately, all this effort doesn’t show and it’s nothing special either – it’s just 2D vector graphics 101.
The scene consists of four subparts. The first part contains the Kakiarts logo and group name. The second part writes the text »presents the 64k intro«, which is surrounded by symbols from all previous Kakiarts 64k intros, not limited to those I made myself: There’s the vortex symbol from »Vortex« and »Vortex 2«, the rastered cube from the loader of »rastro«, a power pole from »breakloose«, the butterfly from »riot of flowers« and a hedgehog from »3D Igel« (though it’s very small because it’s very very ugly :).
The next part mentions the intro’s name, surrounded by tentacle-like things. I liked the tentacles so much that I re-used them later for some transitions and the loader, making them the only consistent design element of the intro. The last part is pure Evoke crowdpleasing featuring the legendary »ZVOKZ« logo.
Effect #2: Reflecting spikeball
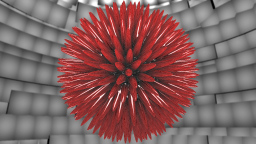 Originally this effect was intended to simulate some kind of ferrofluid, but the result didn’t look very realistic. However, many people still recognize the ball as something made from a ferrofluid, so it can’t be that far from reality, except that the spikes are red instead of black :)
The ball is rendered from a static, finely tesselated mesh of a subdivided icosahedron. The spikes are generated inside the vertex shader and the pixel shader just applies the reflections from the environment. There are two cubemaps involved in this process, both of which are static: Obviously, there’s a cubemap for the (static) background that is reflected in the spikeball. The other cubemap is called the »spikemap« – it’s a grayscale cubemap where spikes are entered as white spots.
Using the spikemap, the vertex shader computes the actual position of each vertex, based on the base vertex position (which is always a point on the ball mesh), scaled by the value from the spikemap. That’s also why the intro requires a Shader Model 4.0 graphics card: Vertex Texture Fetch is available on SM 3.0 hardware for very few pixel formats only, and I simply didn’t want to convert the texture. Normals are generated by fetching 4 additional samples around each vertex and computing the cross product from the differences of the positions in each direction.
Even though the spikemap is technically a cube map, it’s actually just a simple 2D texture containing six different »subtextures« for each of the cube map views. The conversion from cube map texture coordinates to 2D texture coordinates is done in the vertex shader, too. I use this peculiar method because the AMD ShaderAnalyzer told me that cube maps can’t be sampled in vertex shaders on ATI hardware, so I had to do this workaround.
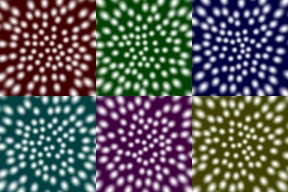
That’s what the spike map looks like. Originally, it’s grayscale, I just colored it here so you can tell the cube map faces apart.
The spikemap is generated at runtime by rendering lots of small non-overlapping circular sparks from six views and merging them into a single texture.
Effect #3: Field of spheres
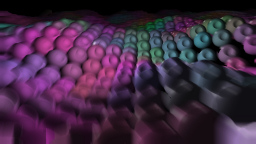 This effect is basically the 3D version of »Vortex 2«’s last effect. Technically, it’s really nothing special: A field of some 10,000 balls with dents arranged on a simple heightmap, and the dents follow an »attractor« that is drawn as a small spark of light. The camera path is the usual sin/cos stuff – in fact, everything in »Applied Mediocrity« is sin/cos and translations; no splines were used at all.
To make the framerate of the scene bearable, some ultra-primitive form of frustum culling is used: The dot product of the normalized view direction vector and the normalized distance between the camera and each ball is computed, and if the result is below a certain threshold, the ball is culled. In addition to that, the ball meshes are available in four levels of detail (2720, 720, 200 and 60 vertices). LOD selection is done based on the distance from the camera position.

The ball in different levels of detail.
To add some extra effect, the scene also uses a primitive form of motion blur. In addition to the scene itself, another image containing »motion vectors« (MVs) is drawn. This image has a gray background. A course approximation of each ball (unshaded, extremely low-poly, without the dent, and a little bit larger than the original) is drawn unshaded in a solid color that encodes the difference in the screen position of the ball from the last frame to the current one. E.g. if the ball’s center was at screen position (500, 400) in the last frame and is at position (510, 395) now, the ball is drawn in the color (128+510-500, 128+395-400, 128) = (138, 123, 128).
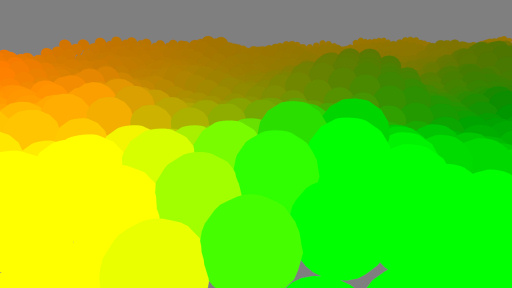
Example motion vector field.
This motion vector field image is then used by a post-processing shader to apply motion blur. The color values from the MV field are used to control the direction and length of the blur for each pixel. 8 samples are taken along the blur direction and averaged. The same filter is applied another time with only one-eighth of the blur length, generating an image that is roughly equivalent to a single-pass 64-tap blur.
The end result is a decent-looking motion blur, but at the edges of the image and at some places between the balls, artifacts can be seen. However, the motion is quick enough that they usually aren’t apparent when watching the scene the first few times ;)
Effect #4: Truchet tunnel
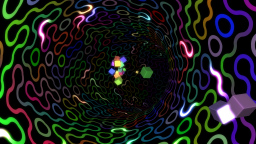 While the previous scene was the extension of a former 2D scene to 3D, this is the reverse: The »tube lattice« scene from Vortex 2 showed a three-dimensional Truchet tiling, and this scene has a 2D Truchet tiling mapped on the walls of a tunnel (actually a torus). This tiling has the interesting property of building anything from simple circles to complex twisted paths that go on over hundreds of tiles.
Since a Truchet tiling alone doesn’t look all that interesting – especially not when in motion – I added some color to it. Each tile has four »ports« (as I call them) on its upper, lower, left and right edges. Each of these ports is assigned a color and the colors of each pair of ports are blended along the circle connecting them. Since it’s a continuous tiling, the color of e.g. the right port of a tile must be the same as the left port of the right neighbor tile. In fact, it’s actually the same port, so there are effectively only two ports per tile – one vertical (I chose the left edge) and one horizontal (I chose the bottom edge).
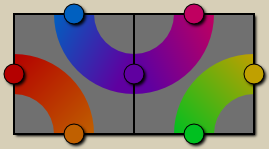
The two possible orientations of truchet tiles, with all ports and some example colors.
Initially, the colors are filled with random values. However, there are three different kinds of mutation taking place over time. First, the color of each port is pulled towards the color of each of its connected neighbor ports every 1/8 second (a »tick«). This makes colorful patterns »average out« over time.
Second, at random intervals and random locations, »seeds« appear and dissapear: These are ports that are re-initialized to a fixed color every tick. Since that color is then distributed to the neighbor ports by the first mutation rule, the seed color seems to spill out of the seed location along the Truchet path.
In the final scene, these two effects are almost unnoticeable, but I didn’t remove them. What can clearly be seen, though, is the third form of color alteration: the »worms«. The worms are the white glowing things that meander through the tiling. Their positions are represented internally by the ports they occupy. Each tick, the locations of the ports are updated with the next port in the direction of the movement. By careful selection of the colors of the tiles a worm occupies, a smooth animation is realized between the ticks. At a certain position inside the glowing white part of a worm, the color of the underlying port is also changed so it seems that the worm is changing the color pattern as it wanders around.
Apart from the glow, the whole tunnel is drawn in only one pass using only one texture. However, that texture is carefully constructed and very specific to the Truchet tiles used and has not much to do with the color that is eventually composed by the pixel shader.
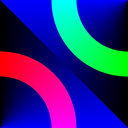
The truchet texture. The red and green channels encode the intensity of the two quarter circles, the blue channel encodes a gradient along the circumference of the circles.
Since the scene looked a little bit empty, I added the small floating cubes in the second part of the scene. These are simply phong-shaded chamfered cubes.
Effect #5: Spiked triangle ball
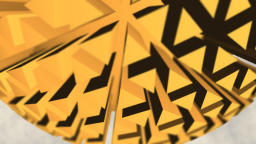 This is a scene I always wanted to do, but as it turned out, it doesn’t look all that great. The basis for the spike ball is another subdivided icosahedron, but with much less detail than the one used in the other spikeball scene. There are also many additional vertices added after the subdivision so that there are surfaces for the »bottom« of the ball, the main surface and the vertical edges of the spikes.
The final mesh generated by the CPU is static – all the shrinking and growing effects of the spikes are done in the vertex shader. In addition, a simple depth-of-field blur is used. The background is mostly gray with three (barely visible) layers of fractal clouds added to it in a pixel shader.
Effect #6: Cylinder of plates
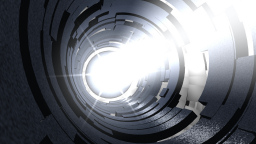 This is perhaps the most famous scene in the intro, even though I never understood why everybody loves it so much. What we have here is just a shaft made of ~500 small cylindrical plates with a wide (additionally blended) beam of light in it. The plates are phong-shaded and a texture with random RGB values is used to add some distortion to the per-pixel normal vectors, making the surface appear rough. The background of the scene is generated by the same random geometry generation algorithm as in the first spikeball scene, but with other parameters (making a cigar-shaped room instead of a sphere-shaped one). In the second part of the scene, when the viewer is outside the shaft and looks at the greetings, the central beam is made much, much stronger and a glow effect is applied to the holes inside the plate pattern.
The main effect in this scene is really the movement of the plates. This is computed completely at runtime, based on a few small bitmaps describing how the greetings shall look like. The plates are considered to be arranged on an array of 48×32 fields, whereby the X direction maps to the length axis of the cylinder and the Y axis represents the 32 possible rotations around the length axis. The array wraps around the Y/rotation axis, i.e. the field above (x, 0) is (x, 31). Each plate is an object with a size of 1×1 to 1×8 fields in this array, corresponding to the different plate sizes.
Initially, the 500 plates are distributed randomly in the bitmap and are allowed to overlap arbitrarily. In the first few animation steps, roughly half of the plates are moved to new locations close to the old position. It’s not until a second before the viewer leaves the cylindrical shaft that the real magic begins and the plate positions are controlled by bitmaps.
The control bitmaps only have a three-»color« palette: plate (»I want at least one plate here«), hole (»there must not be a plate here«) and undefined (»I don’t care whether or not there is a plate here«). The first bitmap is almost completely undefined, except of a few fields that are marked as holes – this is the area where the viewer flies through the cylinder wall, and since we don’t want to collide with a plate, we need to move all plates away from there.
In this first step, the algorithm for the plates is relatively easy: All plates that cover at least one field marked as »hole« are moved away so they don’t cover a hole any longer. In addition to that, a few random movements are also performed on the other plates (so that again roughtly half of the plates has been moved), but this time, care is taken that no randomly moved plate covers a hole either.
The animation phases that display the actual greetings text contain bitmaps where one half is undefined (this is the half on the far side of the shaft) and the other half is set to »plate« with a few holes inbetween. These holes then form the letters of the greetings.
In these phases, the plate generator has some more work: It does not only need to make sure that no holes are covered, but also that every field that wants to be covered by a plate actually is covered. This works by searching for suitable plates in the vicinity of each uncovered position and pulling one of them there if it fits.
I originally planned to pre-process the plate positions in a Python script and only store the final position data in the executable, but I soon found out that the required amount of position data is too large to be stored (about 30 kb uncompressed). So I rewrote the whole plate generation in C and put it directly into the intro.
Effect #7: Crystal cubes
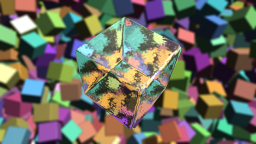 This scene is my attempt at a refraction effect. Even though it looks like proper refraction, it actually isn’t – it’s just an approximation that is barely good enough.
Unlike most other refraction implementations I found on the internet, I wanted to take the actual depth of the refracting object into account. So I use a two-pass method: First, the back faces of the refracting cubes are drawn into a secondary buffer. In this pass, the normals at each point are encoded into color values and the depth is encoded as the alpha value; actual lighting computation don’t take place yet. In the second pass, which draws the front faces of the crystal cubes, the pixel shader has a lot more work to do. First, it uses the normal vector at each pixel to computeapproximate the direction of the refracted ray. Based on the difference of the depth at the current pixel (which is the depth at the point where the light ray enters the crystal cube) and the alpha value the current pixel in the secondary buffer (which is the depth at the back side of the cube), the vector is scaled so that it contains the approximate screen-space x/y position of the point where the ray leaves the crystal cube. The secondary buffer is read again to extract the normal vector and refract the ray again. The final ray’s direction vector is then used to fetch a pixel from the background buffer. Specular lighting is added to that value before it’s written into the color buffer.
Effect #8: Heightfield »Game of Life«
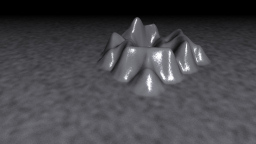 The idea to map Conway’s Game of Life on an animated heightfield is based on inspiration from a friend. I think I don’t need to say much about the Game of Life aspects of the scene, because everybody should know that cellular automaton. The animations and the heightfield are the interesting aspects here.
The animations are done by trying to find a matched pair of neighboring born and dying cells after each generation of the game. If no such pair can be found, the cell gets born or dies by simply changing the height of the associated spot.
Rendering is done in two steps: Dead cells without living neighbors are drawn using a single quad. The rough structure of the ground is generated in a pixel shader. Cells that are alive or have at least one living neighbor are drawn from a static moderately-tesselated flat square mesh (289 vertices). The actual heightmap is applied in the vertex shader. Initially, I planned to use Vertex Texture Fetch for this, but in the end, I came up with a better solution: Since the shape of the hills is just a polynomial, I can of course compute it right in the vertex shader. For this reason, the shader receives only a list of the position and height of all hills in the 9 surrounding cells. The effective height of each vertex is the sum of the height functions for all 9 hills. If there are less then 9 surrounding hills for a cell, they are simply set to zero height. The normal vector is computed by taking 4 additional samples and calculating the cross product, just like in the first spikeball scene.
That’s it!
That’s it – now you know the basic principles how the effects in the intro are implemented. If you have any further questions, don’t hesitate to ask.

 Post Feed
I love the Intro and your explanationts are really good. Thanks! Keep up the awesome work!
great guide.
Awesome article, KeyJ. Thanks.
Cool explanation man. Sincere, direct and leaving no doubts. Long life to 4k coding! :)
I really appreciate the fresh feeling of this intro, with a true demo spirit… and this is a really nice article too! Effects are explained quite simply, leaving details to our imagination, which is a good way to favor new experimentation…
Thanks!
Why do i get a trojan warning, when i start downloading this demo?
(i actually wanted to run it on my virtual mashine anyway)
floste: Because your virus scanner is broken. Some paranoid virus scanners complain about almost all demoscene 4k and 64k intros, and yours seems to belong into this category. Besides, it’s possible that it won’t run in a virtual machine anyway, unless you have OpenGL acceleration in your VM. If you’re on Linux or *BSD, you should rather try WINE.
Great work and nice site you have here. I love the crystal cubes and effect. Greetz