 Post Feed
PhotoJoin, a photo synchronization tool
In this post, I’ll present a solution to a common problem that occurs quite often nowadays: Merging photos from multiple people into one continuous, consistent stream. It is definitely not the first solution to that problem, but since I couldn’t find a tool that solves this in exactly the way I want, I just did it myself, as usual ;)
The scenario
Let’s imagine that Alice, Bob, Chloe and Daniel are good friends and go on vacation together. Like usual these days, all of them have their own digital camera and all of them make photos. Now they are back home and want to watch the pictures and distribute them among each other, so that every one of them has all the photos, including those of the three others. However, that’s not quite as simple as it sounds.
The first approach of the four friends is to just put all images into a single directory. This didn’t work properly – the file names of two of the cameras clashed. So they have to put the images of each camera into a directory of its own. This works fine, but then the photoshow turns out to be actually four shows: The vacation is shown from Alice’s perspective first, then from Bob’s, then Chloe’s, then Daniel’s. Moreover, Bob’s image counter wrapped at one point during the vacation (IMG_9999.JPG → IMG_0001.JPG), so they saw the first half of the vacation after the second half. That was solved by having the viewer show the images in chronological instead of lexicographical order – but that’s an option not every viewer supports.
Anyway, it would be much nicer to have a single timeline with all the photos of all cameras merged together. Again, some viewers have an option to show multiple directories at once, but not all of them do. So it still makes sense to put all images into a common directory. Daniel quickly remembered that some tools (like Total Commander, KRename or NameChanger) can rename multiple files to give them unique prefixes. Daniel’s DSCF0921.JPG would turn into Daniel_DSCF0921.JPG and wouldn’t clash with Chloe’s same-named file any longer. As is turns out, these renaming tools can also put the file modification date and time in front of the file name, which not only solves Bob’s wrap-around problem, but gives the four friends what they wanted in the first place: A directory with all photos, sorted by time and not camera, viewable in chronological order with any image viewer in existence.
Unfortunately, this method turned out to be anything but perfect: The first problem was that Bob already rotated the portrait-format photos he made, changing the file modification time. A solution was quickly found though: Instead of using the file modification time, most renaming tools also offer an option to use the Exif timestamp stored in the file itself. This timestamp is usually not modified by image editors, and thus Bob’s images came back into order.
But even using Exif timestamps can’t solve the problems in ordering that result from diverging camera clocks. Whenever photos where taken at about the same time, Daniel’s shot came first, then Bob’s, then Chloe’s, often overlapping with events that normally followed a few minutes later or took place a few minutes earlier. This was even worse with Alice’s photos, which always came an hour too late because she didn’t even have daylight savings time set up properly!
There are solutions for this, too. The idea is to synchronize all the cameras to a common timeline either by having them take a photo at the exact same time or better yet, by taking a photograph of a clock with each camera. Then the timestamp of the photo can be compared against the actual time the photo was taken and all photos from that camera can be shifted by the same amount. ExifTool can do that, but it requires the user to do the math himself and provide a delta adjustment to the tool manually. Much easier to use are some photo management tools (among them Picasa, Shotwell and iPhoto): In these programs, there are »adjust date and time« wizards where you can open a photo, tell the application the real time when it was taken and have the adjustment automatically applied to all pictures taken with that camera.
But we still want to export the pictures out of the realm of these applications. The first thing to take care of is that since these applications are usually based on internal proprietary databases, it’s important to tell them to update the individual files on disk, too. The other thing is that we’d still need to use a multi-file renamer to put the files into a common directory if we want to distribute them easily and without discrimination of users of less powerful viewers. All in all, it’s a workable, but tedious process. And it requires the use of software behemoths like Picasa or iPhoto, which might not be every user’s taste either.
PhotoJoin tries to fill this gap.
How to use it
0. Installation: The source of the program can be downloaded here:
photojoin.py (~81 k)
It is a Python 2.x (not 3.x!) script that further requires Tkinter. The installation of the Python Imaging Library (PIL) and its Tkinter bindings is also highly recommended. For GNU/Linux systems, these dependencies can be conveniently installed with the python-imaging-tk or python-pil.imagetk package on Debian, Ubuntu, Fedora and its derivates; for other Linux distributions and the BSDs, the package name should be similar. For automatic image rotation, the libjpeg-turbo version of jpegtran needs to be installed, and for previews of video files, FFmpeg is required; however, these two are optional and PhotoJoin will work without them, except for the mentioned features. On the common Linux distributions, these tools are available in the libjpeg-turbo-progs and ffmpeg packages. I’m afraid I can’t give any guidance on OS X – Tkinter and PIL support seems to be somewhat sketchy there, and I don’t have a Mac to build a proper application bundle.
Windows users might find it most convenient to download the following file instead:
PhotoJoin.exe (12.5 MB)
This is a stand-alone executable that requires no installation and should (hopefully) work on any recent 32-bit or 64-bit system. It includes jpegtran (so auto-rotating images while processing will work), but not FFmpeg (so video files will not get a preview by default; this is simply because FFmpeg alone is substantially larger than the remainder of PhotoJoin and its Python runtime combined). Note that some »anti-virus« tools misdetect the program as a trojan – that’s a false alarm, the application is absolutely not dangerous!
1. Take a picture of a clock: With every camera you’re going to synchronize, take a picture of a clock that shows seconds. Preferrably, you’d use a digital clock (to minimize reading errors) which is radio controlled or NTP-synchronized (because if you’re going to synchronize the photos to a common time anyway, why not pick proper UTC as a reference?). Radio-controlled alarm clocks and Windows’ clock applet (when clicked so that the pop-up dialog is shown) are just fine.
2. Download the photos to your computer. Create a parent directory (we’ll call it the project directory from now on) and in it, a subdirectory for each camera. Put the image files from all cameras into their respective directories. For example, this is a good directory structure:
D:\Photos\A walk in the park |
(the project directory) |
D:\Photos\A walk in the park\Alice |
(Alice’s photos) |
D:\Photos\A walk in the park\Bob |
(Bob’s photos) |
D:\Photos\A walk in the park\Chloe |
(Chloe’s photos) |
D:\Photos\A walk in the park\Daniel |
(Daniel’s photos) |
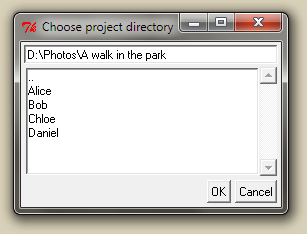
3. Run PhotoJoin and navigate to the project directory: When PhotoJoin is run without any parameters, a directory navigation dialog pops up. Use it to navigate to the project directory and click »OK«:
Instead of navigating to the proper directory at runtime, you can also give PhotoJoin the name of the project directory as a command-line parameter.
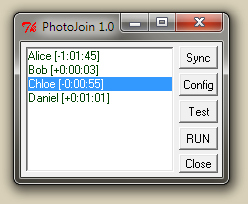
4. Synchronize all subdirectories: PhotoJoin’s main window contains a list of subdirectories of the project directory:
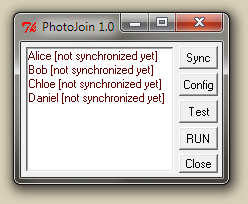
By double-clicking a subdirectory (or selecting it and then clicking the »sync« button), the synchronization window opens. It contains a list of images found in that subdirectory, a preview of the currently selected image (or a button to open the image in an external application if PIL isn’t properly installed) and the date/time adjustment: It displays the date and time of the selected image and expects you to input the date and time when the image has actually been taken. In this window, you select your reference image by double-clicking it, enter the correct time (and, if necessary, date) and click the »OK« button to finish synchronization:
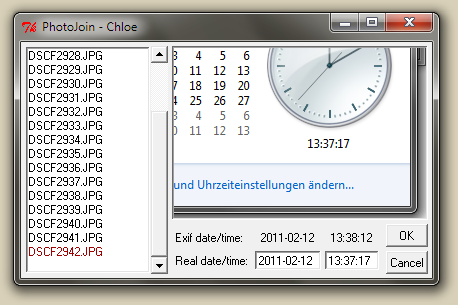
To help you with getting things done quickly, the last image (i.e. the one with the highest number) is auto-selected when the dialog opens, which is usually the one you want if you shot the reference clock images right before uploading the images to your computer. Furthermore, the date and time is taken from the Exif date and time and the time is auto-selected – in fact, in most cases synchronizing a directory means simply double-clicking it, typing in the time you see in the photo on the screen and pressing Enter.
If you do not have a reference image to work with, but decide to trust the clock of the camera, you need to open the synchronization dialog for this subdirectory as well and just press Enter, so that PhotoJoin records the subdirectory as »no time adjustment needed«, but includes it when processing images.
Note that there are some situations where it’s perfectly acceptable to trust the camera’s clock: Some modern cameras have a built-in GPS function that not only provides geo-tagging for photos, but also adjusts the camera’s clock to be perfectly correct; you only need to check whether the timezone and DST adjustment is correct in this case. For photos taken with smartphones, it’s even easier – they get their time from the network, including the correct timezone, so it’s typically safe to just trust the timestamps there.
4. Check the settings (optional) The »Config« button in the main window opens PhotoJoin’s settings dialog. There’s not much to set up there (yet?), but you might want to check the settings anyway:
The filename pattern specifies how the target filenames shall look like. By default, PhotoJoin will construct filenames from the adjusted date and time, the name of the subdirectory where the file came from and the original file name converted to lower-case. You can change that by modifying the (admittedly cryptic) pattern codes – but don’t worry, a help function it built right into PhotoJoin, explaining the meaning of the codes, including examples.
Furthermore, there’s an option to include non-Exif files. If this is not enabled, PhotoJoin will only touch photos containing Exif metadata and .mp4 or .mts video sequences with time information, as typically produced by today’s cameras. Other common camera video formats like .avi do not contain any usable information about their recording time and would normally not be processed. However, if the »non-Exif« switch is enabled, files like these are also included by simply examining their modification time, which is typically set to the correct date and time by the camera.
There’s also an option to set the file modification time of the moved and renamed files to the adjusted date and time. This is useful if the files are going to be shown in chronological order by a viewer application, or if the file names are going to be processed further using a multi-rename tool.
Finally, there are options to modify JPEG images »on the fly« while importing them: the »autorotate« option rotates images that have been captured in portrait orientation, eliminating the perils of the obnoxious Exif orientation tag. The »optimize« option re-encodes the JPEG data without further loss, which results in slightly (~1%) smaller files. As already mentioned above, these options require the external utility jpegtran from the LibJPEG-Turbo project. On GNU/Linux systems, this can be installed with the package manager als libjpeg-turbo-progs; the Windows executable that can be downloaded here already includes a working copy of jpegtran.
5. Start the synchronization: After you’ve synchronized all subdirectories, click the »Run« button in the main window. This will start the actual renaming process, during which the photos from the subdirectories will be moved into the project directory, while the names are modified according to the configured filename pattern:
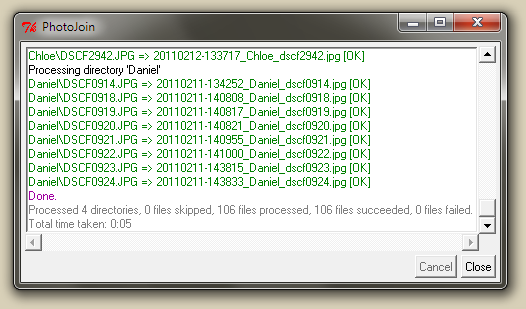
If you want to see the results of the renaming process without actually doing anything (and hence without breaking anything), you can also click the »Test« button in the main window.
6. Add more photos: You may quit PhotoJoin at any time – all settings are saved in a hidden file (called .photojoin) in the project directory, including the time deltas for all subdirectories. This means that you can add more photos at a later time: Initially, you synchronize the first batch. Later on, more photos are shot and the next day, you can upload them to their per-camera subdirectories as usual, start PhotoJoin again and click »Run« right away.
Virus scanners report PhotoJoin.exe as a Trojan.
Virus scanners report PhotoJoin.exe as a trojan